---
title: GPU Compute
---
:::info Pro Plan Offering
The ClearML GPU Compute App is available under the ClearML Pro plan
:::
Set up to run your workloads on 100% green cloud machines at optimized costs – no setup required! The ClearML GPU Compute
Application automatically spins cloud machines up or down based on demand. The app optimizes machine usage according to
a user defined resource budget: define your budget by specifying the GPU type and number of GPUs you want to use.
Each application instance monitors a ClearML queue: new cloud machines are spun up if there are pending jobs on the
queue. The app instance automatically terminates idle machines based on a specified maximum idle time.
For more information about how autoscalers work, see [Autoscalers Overview](../../cloud_autoscaling/autoscaling_overview.md#autoscaler-applications).
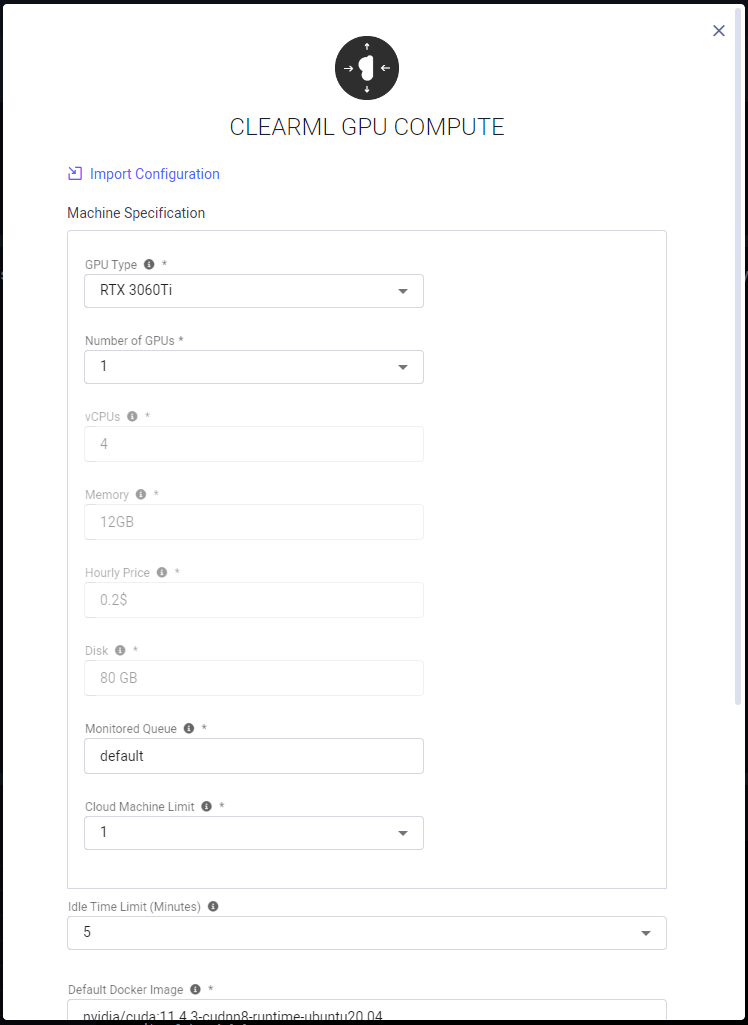
## GPU Compute Instance Configuration
* **Import Configuration** - Import an app instance configuration file. This will fill the configuration wizard with the
values from the file, which can be modified before launching the app instance
* **Machine Specification**
* GPU Type - NVIDIA GPU on the machine
* Number of GPUs - Number of GPUs in the cloud machine
* The rest of the machine's available resources are dependent on the number and type of GPUs specified above:
* vCPUs - Number of vCPUs in the cloud machine
* Memory - RAM available to the cloud machine
* Hourly Price - Machine's hourly rate
* Disk - Amount of Disk space available to the cloud machine
* Monitored Queue - Queue associated with application instance. The tasks enqueued to this queue will be executed on
machines of this specification
* Cloud Machine Limit - Maximum number of concurrent machines to launch
* **Idle Time Limit** (optional) - Maximum time in minutes that a cloud machine can be idle before it is spun down
* **Default Docker Image** - Default Docker image in which the ClearML Agent will run. Provide a Docker stored
in a Docker artifactory so instances can automatically fetch it
* **Git Configuration** - Git credentials with which the ClearML Agents running on your cloud instances will access your repositories to retrieve the code for their jobs
* Git User
* Git Password / Personal Access Token
* **Cloud Storage Access** (optional) - Access credentials to cloud storage service. Provides ClearML Tasks running on cloud
machines access to your storage
* **Additional ClearML Configuration** (optional) - A ClearML configuration file to use by the ClearML Agent when executing your experiments
## Dashboard
Once a GPU Compute instance is launched, the dashboard displays a summary of your cloud usage and costs.
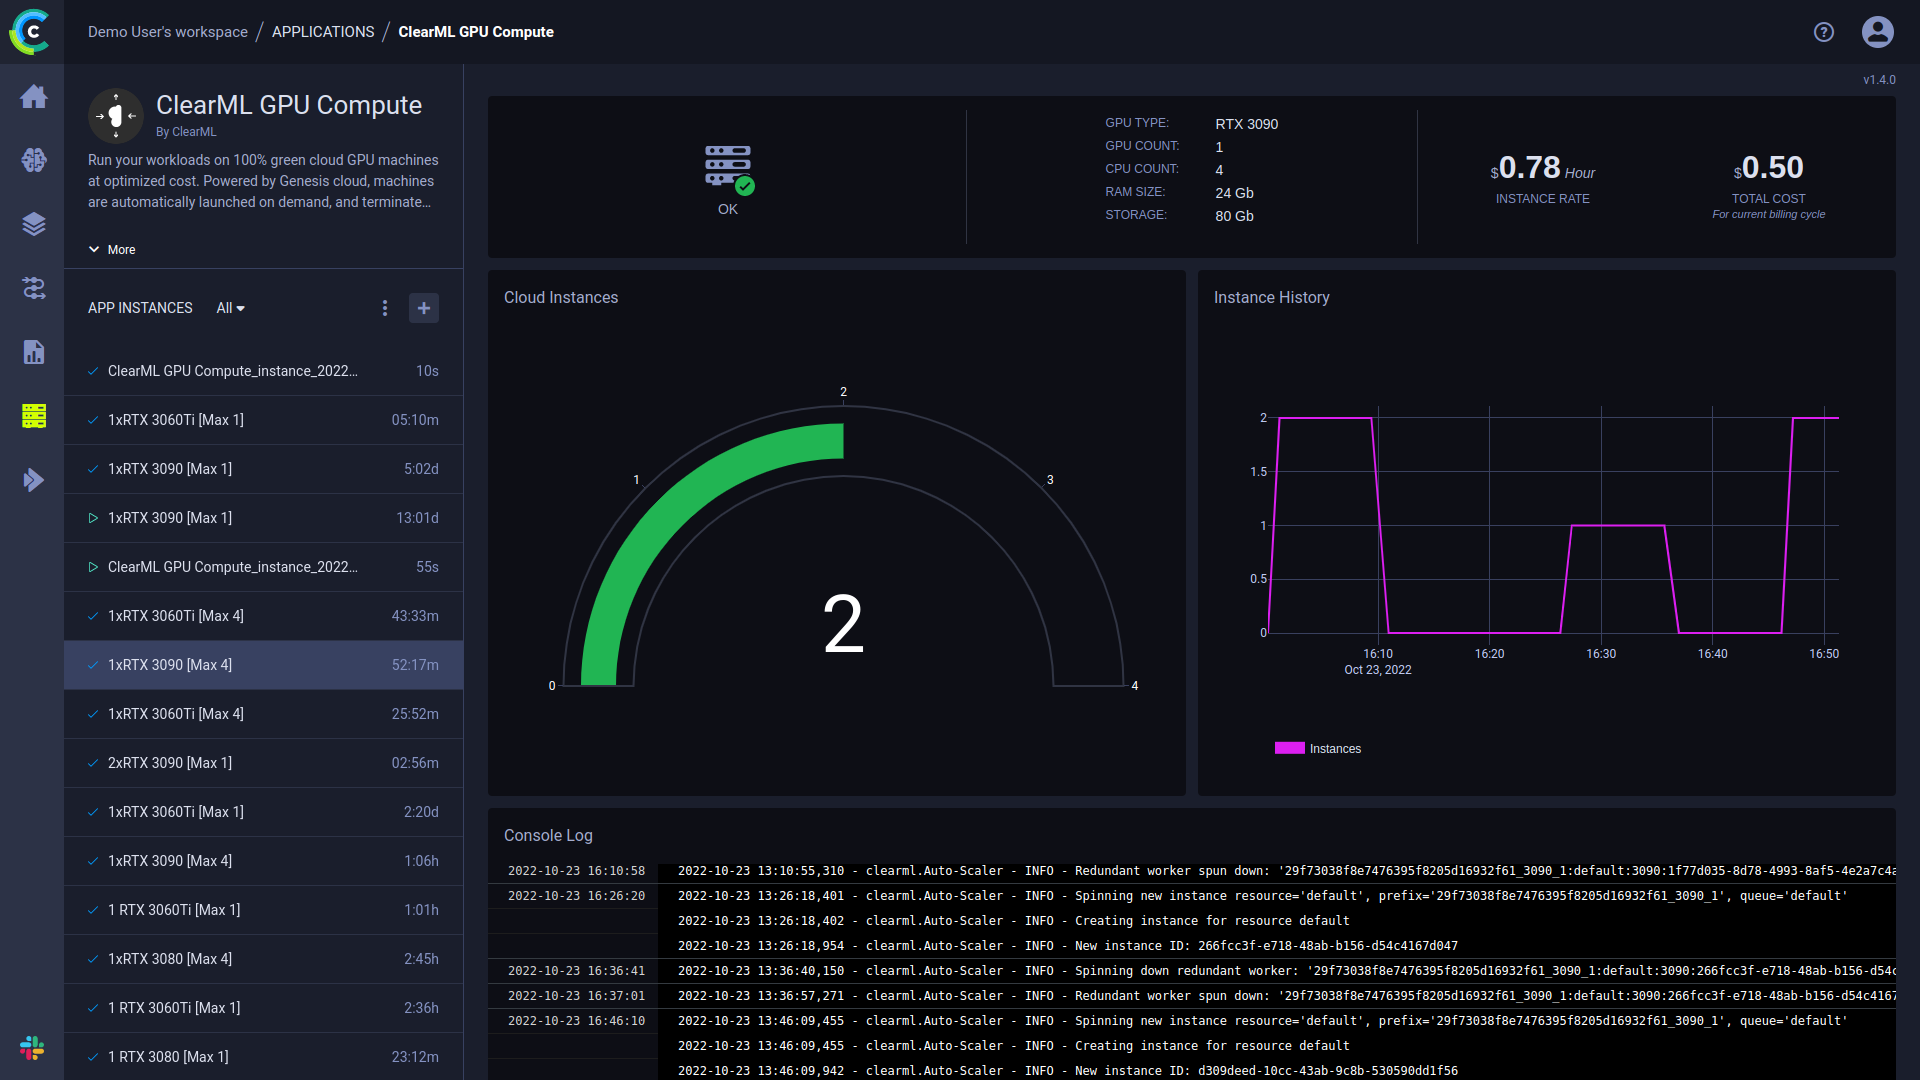
The GPU Compute dashboard shows:
* Service status indicator
*  - Cloud service is available
*
- Cloud service is available
*  - Cloud service is currently unavailable
* Cloud instance details
* GPU type
* Number of GPUs
* Number of vCPUs
* RAM
* Storage
* Cost details
* Instance rate
* Total cost for current billing cycle
* Number of current running cloud instances
* Instance History - Number of running cloud instances over time
* Console - The log shows updates of cloud instances being spun up/down.
:::tip Console Debugging
To make the autoscaler console log show additional debug information, change an active app instance's log level to DEBUG:
1. Go to the app instance task's page > **CONFIGURATION** tab > **USER PROPERTIES** section
1. Hover over the section > Click `Edit` > Click `+ADD PARAMETER`
1. Input `log_level` as the key and `DEBUG` as the value of the new parameter.
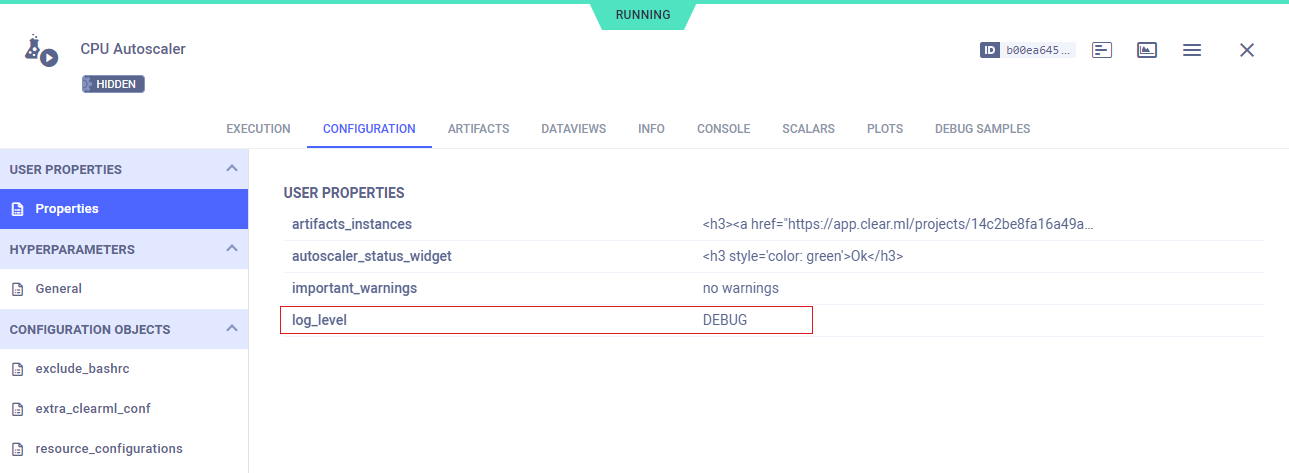
The console's log level will update in the autoscaler's next iteration.
:::
:::tip EMBEDDING CLEARML VISUALIZATION
You can embed plots from the app instance dashboard into [ClearML Reports](../webapp_reports.md). These visualizations
are updated live as the app instance(s) updates. The Enterprise Plan and Hosted Service support embedding resources in
external tools (e.g. Notion). Hover over the plot and click
- Cloud service is currently unavailable
* Cloud instance details
* GPU type
* Number of GPUs
* Number of vCPUs
* RAM
* Storage
* Cost details
* Instance rate
* Total cost for current billing cycle
* Number of current running cloud instances
* Instance History - Number of running cloud instances over time
* Console - The log shows updates of cloud instances being spun up/down.
:::tip Console Debugging
To make the autoscaler console log show additional debug information, change an active app instance's log level to DEBUG:
1. Go to the app instance task's page > **CONFIGURATION** tab > **USER PROPERTIES** section
1. Hover over the section > Click `Edit` > Click `+ADD PARAMETER`
1. Input `log_level` as the key and `DEBUG` as the value of the new parameter.

The console's log level will update in the autoscaler's next iteration.
:::
:::tip EMBEDDING CLEARML VISUALIZATION
You can embed plots from the app instance dashboard into [ClearML Reports](../webapp_reports.md). These visualizations
are updated live as the app instance(s) updates. The Enterprise Plan and Hosted Service support embedding resources in
external tools (e.g. Notion). Hover over the plot and click  to copy the embed code, and navigate to a report to paste the embed code.
:::
to copy the embed code, and navigate to a report to paste the embed code.
:::